I wrote a blog about power query calendar tables a few years ago over at PowerPivotPro.com. I have learnt a lot about Power Query since that time, plus Power Query has come along in leaps and bounds, and it now has a lot more capability than it had previously. Today I am going to write a new post showing you how to build a reusable Calendar Table using Power Query. Once you build a query like this, you can cut and paste the code into a text storage tool (like OneNote) and reuse it over and over for all of your data models – very cool. Plus you just might learn a few new Power Query tricks along the way.
The UI is Your Friend
My approach to teaching people to use Power Query is to always use the UI where possible. I first use the UI to do the hard work, then jump in and make small changes to the code created by the UI to meet any specific variations required. Keep this concept in mind as you read this article.
I am going to use Power BI Desktop as the tool for this, but of course Power Query for Excel will work just as well and the process is identical. In fact the calendar query at the end can easily be cut and pasted between Power BI and Power Query for Excel.
Step 1: Create a list of Dates
I'm going to start off by creating a blank query. Get Data\Other\Blank Query. This simply creates a new query with no data in it, and importantly no data source.

I immediately renamed the query and gave it the better name, "Calendar".
Next I created a list of dates to start my calendar off. I just typed in the function List.Dates into the formula bar without any parameters (and no brackets) as you can see below.
- If you can't see the formula bar, you can turn it on from the View menu.
- Be aware that the M language is case sensitive, so list.dates will not work – you must type in List.Dates
Now of course you need to "know" that this formula exists to be able to use it – but now you know, so you can use it too. At some stage in the future we are all hoping that Microsoft will deliver Intellisense to Power Query¹. If that ever happens then this type of coding will become a lot easier.
¹ Note: M Intellisense was made generally available to Power Query in April 2019

The M language is self documenting. As you can see above, when you enter the function name without any parameters and without the brackets, the UI will display the documentation that shows you how to use the function. I just entered some starting data into the parameters wizard as follows, then clicked the button to invoke the function.

After doing this, something strange happened. A new query was created (2 below) and this new query passes the parameters to the first query (shown in 3 below). Let me explain this further.
The first Query (shown as 1 below) Calendar has 1 line:
= List.Dates
The second Query (shown as 2 below) called Invoked Function has 1 line also:
= Calendar(#date(2016, 1, 1), 100, #duration(1, 0, 0, 0))
As you can see in the code above, the second query is simply passing the set of parameters (inside the brackets) to the first query, which is the function itself. This can be simplified by simply passing the parameters directly to the function itself. The word Calendar (shown as 3 below) is therefore not a function, but a reference to the Calendar query that contains the name of the function (1 below) .

I simply copied the code between the brackets (…….) from the Invoked Query function (2 above) and pasted this back directly into the source step of the Calendar query (1 above) as shown below.

Then I just deleted the Invoked Function query – it is not needed.
Note: the benefit of invoking the function is that it manages all the syntax and parameters automatically for you using the UI wizard – much easier given there is currently no Intellisense capabilities in Power Query.
After hacking this code to simplify it into a single query/single step, I then:
- Converted the resulting "list" into a "table" using the "To Table" button.
- Renamed the column to be called "Date".
- Changed the data type to Date.
Step 2: Allow The User to Set the Start Date and End Date
I want this to be a reusable Calendar table, and that implies that I will want different start dates for different uses. Also I want this calendar table to "grow" over time so I don't have to keep setting a new end date. I refer you back to the formula in the source step above:
= List.Dates(#date(2016, 1, 1), 100, #duration(1, 0, 0, 0))
Note that the start date is hard coded as 1/1/2016 and the calendar is set to load 100 days. Below I will show you how to make the start date easier to maintain and the end date automatically set to the current date.
Start Date
I added a new step using the "Add Step" button (1 below). This created a new step (2 below). Note how this new step automatically references the previous step (3). This is the default, but it doesn't have to be this way.

I simply replaced this code (3 above) with the actual date (1/1/2016 in this case), and renamed the step StartDate. Note there is no equals sign used, just the date entered as 1/1/2016. This new step called StartDate is a hard coded step in the query that stores the required start date as a scalar value. You can tell it is a scalar value because the results pane below the Formula Bar is displaying the scalar value, not a table (1 below). (Note it is possible to use a parameter instead of a custom step, but this would create an additional query – I prefer to have everything embedded in the same master query).

This new step StartDate can be referenced from inside any other step in the query. I then went back to the Source step, and replaced the originally hard coded date with the reference to the StartDate step as shown below.

The query still works of course. Note that the Source step is now referring to the StartDate step, yet the StartDate step doesn't appear until way down the list of steps. This is perfectly legal in the M language – the steps do not have to be executed in any logical order.
End Date (Length of Calendar)
Just to make things difficult, you can't specify an end date for the calendar. Instead you have to specify how many periods (days in this case) the calendar should run for. I want my calendar to run up to and including the current date every time the calendar is refreshed. This implies I have to find out today's date and then subtract the start date and hence calculate how many days are required in the calendar.
I added a new custom step again and entered the M function DateTime.LocalNow without any parameters. (remember, if you just type the function name, the documentation will appear.

From the documentation above, I can see that there are no parameters required for this function. So I just added () to the end of the function to return the current date/time. You can see once again that this is a scalar value (not a table) because you can "see" the value below the formula bar.

The next problem is that this is Date/Time format. I only want Date format, so I wrapped a DateTime.Date() function around the code to extract the date portion (shown below). I renamed this step Today. Each time the query is refreshed, this step will automatically update to reflect the current date.

Next I added a new step and subtracted StartDate from the Today to get the duration.

Just by looking at the UI above (red box), you can see that there is some strange data format returned. You can probably work out this data is in the format DDD:HH:MM:SS. This "duration" format wont work in the next step I am about to show you, so first I needed to extract an integer portion of the duration so it contains just the days. I did this using a function called Duration.Days below.
Here is the new code. I also renamed this step to "Length". You can see in the image below that this is now an integer value.

Back to the Source step to change the first line of code to use the Length instead of the hard coded 100 days. You can see the final version of the Source step below.
 .
.
Great. Now the user can manually change the StartDate step to any date, and the calendar will auto grow in length. Actually this code will grow up to yesterday's date. You can simply add 1 to the Length to make it grow up to and including the current date.

Step 3: Build out the Calendar
Most of the hard work is already done. Time to add the columns needed in the calendar. I clicked on the last step (1 below) – "Houston, we have a problem". Note below that all I have on the screen now is the length of the calendar. But I need "the calendar", not "the length of the calendar".

This is an easy fix. Remember I said above that the steps don't have to flow in order. I just added a new custom step, then change the code to refer to the last step that actually showed the calendar. This new custom step (1 below) "reaches back" up the query steps and "grabs" the calendar in the state that it last existed (2 below) and makes it the last step again.

Add the Year
To add the year, I clicked on the Date column (1), selected Add Column (2), Date (3), Year (4), Year (5).

What About Financial Year?
The default year column is calendar year. But many companies have a financial (or fiscal) year. In Australia at least, most companies have a financial year starting on 1 July. Here is a neat trick I learnt from a buddy of mine Dave who is an Excel VBA consultant and guru. The trick is to add 184 days to the date before extracting the year – it always works as long as your financial year starts on 1 July.
When I tried to do this the first time in the code, I got an error.

It seems you can't add an integer to a date in Power Query like you can in Excel. But if you take a look back at the first step (Source) again, you will see the syntax that is needed.

Power Query will only add the days after they are converted to a "duration". When I made this change, it worked for me as you can see below.

My new code (1 above) correctly calculates the financial year (shown in 2). Note I also changed the default column name to "Fin Year" to avoid confusion with calendar year.
Add Other Columns
You can repeat the process of adding as many other columns you like, including Month Name, Month Number etc (using Add Column\Date from the menu). I have done this in my Power Query calendar table but haven't shown the steps in this article.
M Language Hacks
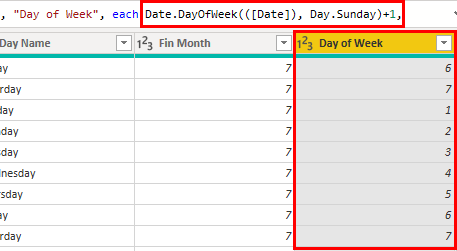
As you have already seen, I like to hack the code automatically generated by Power Query using the formula bar. Below is good example. When I added the day number of week, the days were listed as 0 – 6 (Power Query uses a zero based index system). I prefer to have the days of week numbered 1 through 7, and optimally I like Sunday to be day 1. I could add a new step, add 1 to this column and then delete the original column, but this is a bit messy and adds unnecessary steps. And this is easy to fix by hacking the code using the formula bar. This is what the UI produces (below).

So to make the change, adjust the formula in the formula bar as follows. Add a second bracket between DayOfWeek and [Date]. Then, after the comma following the [Date] closing bracket, add "Day.Sunday)+1,". This will change the day numbers to start at 1, with Sunday being the first day.
So at this point, this is the calendar I have built containing 9 columns in all.


YYMM Column
The next thing I did was to add a unique identifying column for each month.

I simply added a custom column with the following formula to create this column.
=([Fin Year]-2000)*100 + [Fin Month]
I always prefer to create a column YYMM rather than MMYY as the former will sort in the correct chronological order without the need of a sort column. This "human readable" column is great, but it is no good to use as in time intelligence calculations.
ID Columns
It is important to add an ID column that supports the creation of custom time intelligence formulas. I cover time intelligence in detail here. The YYMM column is not useful for time intelligence because the gap between each number is not evenly spaced. eg 1711, 1712, 1801, 1802…
I therefore added an integer based ID column to identify each month over all time. This new column starts at 1 and increases by 1 forever.
(Date.Year([Date]) - Date.Year(StartDate))*12 + Date.Month(Date)
Copy the Code to Reuse the Power Query calendar table
Now the calendar is done, it is just a matter of copying the code and saving it somewhere so it can be reused later. I keep mine in Microsoft OneNote and just cut and paste it when needed. Just go to the Advanced Editor, copy the code and paste it somewhere for later. Here is my code below. Feel free to copy mine and use it in another Power Query Calendar Table if you like.
let Source = List.Dates(StartDate, Length, #duration(1, 0, 0, 0)), #"Converted to Table" = Table.FromList(Source, Splitter.SplitByNothing(), null, null, ExtraValues.Error), #"Renamed Columns" = Table.RenameColumns(#"Converted to Table",{{"Column1", "Date"}}), #"Changed Type" = Table.TransformColumnTypes(#"Renamed Columns",{{"Date", type date}}), StartDate = #date(2016, 1, 1), Today = DateTime.Date(DateTime.LocalNow()), Length = Duration.Days(Today - StartDate), Custom1 = #"Changed Type", #"Inserted Year" = Table.AddColumn(Custom1, "Fin Year", each Date.Year([Date]+#duration(184,0,0,0)), Int64.Type), #"Inserted Month Name" = Table.AddColumn(#"Inserted Year", "Month Name", each Date.MonthName([Date]), type text), #"Inserted Day Name" = Table.AddColumn(#"Inserted Month Name", "Day Name", each Date.DayOfWeekName([Date]), type text), #"Inserted Month" = Table.AddColumn(#"Inserted Day Name", "Fin Month", each if Date.Month([Date]) >=7 then Date.Month([Date])-6 else Date.Month([Date])+6 , Int64.Type), #"Inserted Day of Week" = Table.AddColumn(#"Inserted Month", "Day of Week", each Date.DayOfWeek(([Date]), Day.Sunday)+1, Int64.Type), #"Inserted First Characters" = Table.AddColumn(#"Inserted Day of Week", "MMM", each Text.Start([Month Name], 3), type text), #"Inserted First Characters1" = Table.AddColumn(#"Inserted First Characters", "DDD", each Text.Start([Day Name], 3), type text), #"Reordered Columns" = Table.ReorderColumns(#"Inserted First Characters1",{"Date", "Fin Year", "Month Name", "MMM", "Fin Month", "Day Name", "DDD", "Day of Week"}), #"Added Custom" = Table.AddColumn(#"Reordered Columns", "FYMM", each ([Fin Year]-2000)*100 + [Fin Month]), #"Changed Type1" = Table.TransformColumnTypes(#"Added Custom",{{"FYMM", Int64.Type}}), #"Added Custom1" = Table.AddColumn(#"Changed Type1", "MonthID", each (Date.Year([Date]) - Date.Year(StartDate))*12 + Date.Month([Date])), #"Changed Type2" = Table.TransformColumnTypes(#"Added Custom1",{{"MonthID", Int64.Type}}) in #"Changed Type2" And here is the Power Query Calendar table PBIX workbook.
Learn to be a Power Query Expert
If you want to fast track your learning so you can leverage all the power of Power Query, take a look at my self-paced online Power Query training course. You can also watch some free sample Power Query training videos here to get a feel about how you are going to learn.
This training has over 7 hours of video explaining concepts like this. Once you know how, you will be able to save time when creating a Power Query calendar table and do fantastic things you never dreamed possible as a Power Query expert.
Source: https://exceleratorbi.com.au/build-reusable-calendar-table-power-query/
Posted by: aprylpicenoe0194011.blogspot.com

Post a Comment